Excerpt

Showing posts with label android. Show all posts

Tuesday, February 14, 2017

Aplikasi Android yang mesti aku install (mungkin anda juga)

Setiap pengguna telefon (Android / IOS) pasti akan install aplikasi yang dirasakan perlu. Samada untuk kerja, sosial, permainan dan lain-lain.

Sebelum kita install sesuatu aplikasi, perlulah kita fikir pro & cons aplikasi tersebut, harga, saiz, permission, penggunaan data dan lain-lain. Dan untuk itu, berikut adalah sedikit perkongsian tentang aplikasi yang mesti ada di setiap telefon aku.

  1. Al-Quran (Tafsir & by Word)

    • Banyak aplikasi Al-Quran yang pernah aku gunakan sebelum ini, termasuk yang berbayar. Cuma kebelakangan ini, aku lebih kerap gunakan yang ini dan telah pon remove yang lain.

    • Percuma, tiada ads, font yang boleh diubah saiz, tajwid berwarna, terjemahan ayat atau perkataan, lebih banyak pilihan audio dan lain-lain.


  2. Automatic Call Recorder

    • Adalah amat penting untuk kita merakamkan segala perbualan sebagai rujukan dan bukti jika diperlukan. Sebagai contoh, kita dapat jadikan rakaman perbualan dalam pembelian jual-beli secara online/telefon sebagai bukti sekiranya terdapat penipuan. Dalam situasi lain, kita boleh mendengar semula rakaman perbualan sekiranya tidak jelas atau lupa apa yang dibualkan.

    • Percuma dengan ads (terdapat versi Pro), rakaman yang jelas, cloud backup dan lain-lain.


  3. Chrome Browser

    • Sekiranya kita melayari internet dari banyak device (PC, phone, tablet), pasti lebih mudah sekiranya semua bookmarks/password/history dapat digunakan semula di setiap device. Untuk itu, Chrome mempunya fungsi synchronize yang baik dan selamat.

    • Percuma, tiada ads, by Google.


  4. ColorNote

    • Satu aplikasi yang kecil tetapi bagus untuk nota-nota ringkas dan checklist.

    • Percuma, tiada ads, internal & cloud backup, sync multiple devices, reminder.


  5. ES File Explorer Pro

    • Setiap telefon pasti ada pre-installed file manager, tetapi fungsinya adalah terhad. Aplikasi ini amat berguna kepada intermediate / advance user.

    • Cloud management, network browse, FTP mode, SD card analyst, root explorer dan lain-lain.


  6. Flickr

    • Photo hosting yang menawarkan saiz simpanan yang besar (1TB) dan percuma. Selain itu, aplikasi ini juga mempunya fungsi auto sync/backup setiap gambar yang kita snap.


  7. Google Drive

    • Aplikasi yang membolehkan kita akses fail-fail dan gambar yang disimpan di Google Drive. Contohnya, dokumen (word, excel, PDF, etc) yang diupload dari PC.


  8. Google Maps

    • Sangat berguna bagi orang yang selalu sesat atau tak tahu jalan, seperti aku.

    • By Google, data usage friendly, offline maps.


  9. Nova Launcher Prime

    • Bosan dengan interface standard? Aplikasi ini membolehkan kita customize interface di banyak sudut.

    • Banyak customization (home, app drawer, folder, icon, etc), ringan dan pantas.


  10. Quick Profiles

    • Mempercepat dan memudahkan pertukaran volume, wifi dan lain-lain mengikut profile yang direka.

    • Percuma, tiada ads, mudah digunakan.


  11. SideSync

    • Aplikasi daripada Samsung untuk mengawal (remote) dan akses fail di dalam telefon menggunakan PC.

    • Percuma, no ads, wireless and cable remote. Tapi hanya untuk telefon Samsung.


  12. Snapseed

    • The best photo editing app so far (to me).

    • Percuma, no ads, by Google, lots of RAW file editing.


  13. Waktu Solat Malaysia

    • Terkenal di Malaysia kerana buatan rakyat Malaysia.

    • Percuma, no ads, reminder, kompas, themes, plugins dan lain-lain.


  14. QRMaster

    • Aplikasi yang terpaksa install, sebab kalau tak install tak boleh masuk office :-D


Well, that's about it (ada beberapa lagi, tapi dah letih menaip haha). Apa-apa pon, artikel ni hanya sekadar berkongsi pendapat sendiri dan mungkin bukan yang terbaik.

Last but not least;

  • Cuba elakkan install aplikasi yang terdapat ads (iklan) dan cuba beli PRO version jika mampu (banyak yang murah).

  • Lihat ranking, rating, baca review.

  • Fahamkan permission yang akan digunakan oleh aplikasi tersebut.

  • Lihat tahap aktif, bila latest update.

  • etc.


Adios!

Monday, January 30, 2017

Flashtool 0.6.9.1 (Windows)

Yep, I know... it's old. But still useful for someone (like me).

Download Flashtool 0.6.9.1 (Windows)

Latest version? Go to http://www.flashtool.net/

What is Flashtool?
FlashTool is one of the most powerful tools for Sony Xperia devices and has been around since the Xperia X10 days. The utility has been updated to version number 0.9.18.1, which brings a very useful new feature – the ability to download the latest firmware files for your Sony Xperia device.

Once you have downloaded the latest version, simply head over to the Update Checker part of the tool to select and download your firmware. In theory, this negates the need to use two tools (XperiFirm and FlashTool) to create a FTF firmware file as detailed in our recent guide. — http://www.xperiablog.net/

Friday, January 13, 2017

Disable or deactivate Device Security (Smart Manager)

Device: S7 Edge (SM-G930FD)

Android version: 6.0.1 Marshmallow

Scenario: Accidentally activated the Device Security and not able to deactivate anywhere in Smart Manager app.

Instructions to deactivate:

  1. Open the app drawer and select Settings --> Applications --> Application manager

  2. Click MORE menu on right top --> Show system apps

  3. Search for "COM.SAMSUNG.ANDROID.SM.DEVICESECURITY" and tap

  4. Tap the "CLEAR CACHE" following by "CLEAR DATA" (confirm the DELETE if warning prompted)

Monday, July 27, 2015

Tukar "bunyi sentuh" telefon Android

Mesti ada yang dah bosan dengar bunyi sentuh (touch sound) sama setiap kali menyentuh screen telefon kan? Lagi-lagi telefon samsung, rasa dah macam menyelam dalam air bunyi blup-blup-blup hehehe.

Ok, ni ada tutorial mudah untuk menukar bunyi sentuh telefon Android anda. Akan tetapi, hanya boleh digunapakai oleh telefon yang sudah "root". Kalau belum, tak pasti samada boleh atau tidak. Ada yang kata boleh dan ada yang kata tidak. Tutorial ni juga sesuai bagi yang baru bermain-main dengan root :-)

Anyway kalau nak root telefon, cuba cari di Google bagaimana caranya dengan keyword "how to root **model telefon**". Contoh: "how to root galaxy s4"

Sedikit info berkenaan telefon yang digunakan dalam tutorial ni:
Brand: Samsung
Model: Galaxy S4 Active (GT-I9295)
Root: YES

Kalau dah root, ikut langkah-langkah ni:

  1. Cari dan download bunyi-bunyi yang hendak digunakan di internet. Atau boleh download bunyi on_click ni. Simpan ke dalam SD Card telefon

  2. Install apps "file manager" yang boleh gunakan access root, contohnya ES File Explorer File Manager

  3. Buka apps file manager tadi, dan pergi ke file on_click.zip tadi. Cari bunyi yang sesuai dengan play satu persatu, namakan file yang anda minat kepada TW_touch.ogg (untuk telefon Samsung Galaxy S4 Active). **bergantung kepada jenama atau model yang lain, nama file untuk bunyi sentuh mungkin berbeza**

  4. Copy file TW_touch.ogg tadi dan overwrite/paste ke folder: /system/media/audio/ui/ **buat salinan backup jika boleh**

  5. Restart telefon anda dan selesai :-)


Bila telefon dah restart, sentuh di screen telefon dan sepatutnya bunyi sentuh akan bertukar. Selamat mencuba :-)

Wednesday, January 21, 2015

Android WIFI Prioritizer

Situasi:

Di office, aku sering ke hulu ke hilir atas sebab kerja atau keluar pintu untuk menyedut udara segar. Setiap kali bergerak ke tempat lain, signal wifi yang connected akan berkurang. Memandangkan aku ada 2 AP yang utama di office (satu di area depan office dan satu lagi di area belakang), agak leceh kalau nak tukar dari satu AP ke AP lagi satu secara manual.

Persoalan:

Boleh tak kalau phone Android aku tukar AP yang lebih kuat secara automatik setiap kali aku ke area depan atau area belakang office?

Solution:

Boleh! Caranya, install apps WIFI Prioritizer (atau yang seangkatan denganya) dari Google Play dan lengkapkan settings apps tersebut. Settings bergantung kepada apps yang digunakan dan kebanyakannya amat mudah.

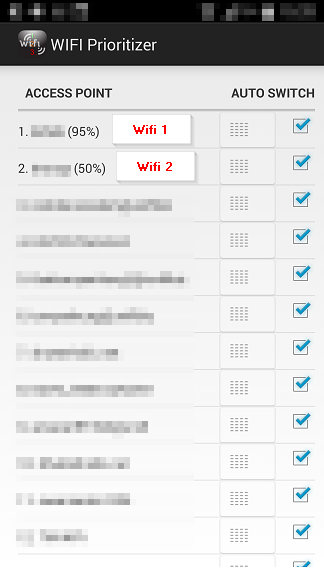
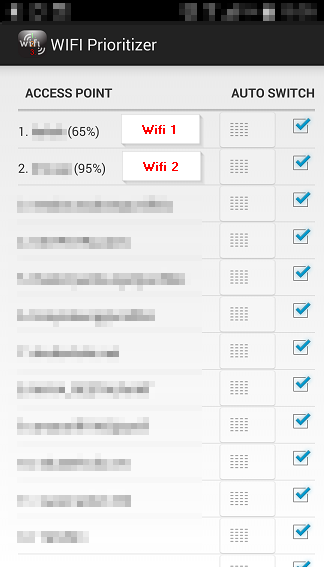
Berikut adalah beberapa screenshot dari apps WIFI Prioritizer di dalam phone aku dan bagaimana ia berfungsi:

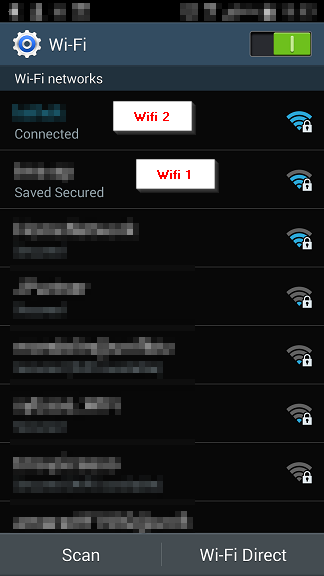
Signal Wifi 1 rendah dan Wifi 2 yang tinggi


Apps akan connect ke Wifi 2 walaupon Wifi 1 masih ada signal (rendah) dan masih connected


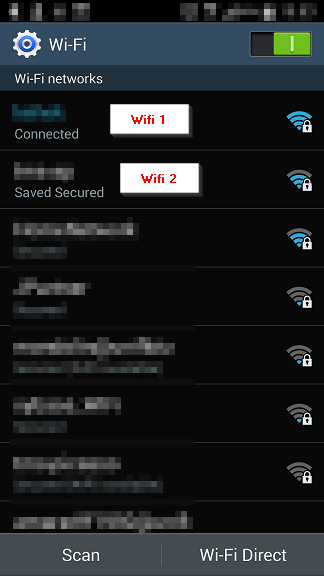
Signal Wifi 1 tinggi dan Wifi 2 rendah


Kali ini, apps akan tukar kepada Wifi 1 walaupon Wifi 2 masih ada signal (rendah) dan connected


Conclusion:

Apps ni amat berguna bagi orang yang sibuk ke hulu ke hilir dalam pejabat (atau rumah) dan sentiasa mahukan signal WIFI yang tertinggi atau stable. Selain dari tu, apps ni juga tidak memerlukan phone Android yang rooted, bermakna boleh install di dalam phone Android yang standard.

Thursday, June 5, 2014

KitKat 4.4.2 EACCES (permission denied). Solved!

Sources:

http://trendblog.net/fix-kitkat-sd-card-write-restriction/

In the last days Samsung has been pushing out Android 4.4.2 to flagship devices like the Galaxy Note III and Galaxy S4. Unfortunately, Google implemented an SD card write restriction (EACCES) in the latest Android version which can be quite annoying for users with an SD card in their phone.

The new “feature” basically restricts apps from writing to external SD cards. This can be quite annoying, because many users want to store apps on a secondary SD card instead of the main storage unit.

Luckily, fixing this problem can be easily done if you have root access. Here’s how you can do it (Please be aware that you’re performing these changes on your own risk!):

  1. Make sure that you have root access

  2. Perform a NANDROID backup to be completely safe

  3. Use a root-enabled file manager and navigate to /system/etc/permissions

  4. Edit platform.xml and find “WRITE_EXTERNAL_STORAGE“

  5. Add an additional group definition for this permission: <group gid=”media_rw” />

  6. Save the changes and restart your device

  7. You are now able to write on your external SD card again


p/s: In my case, I used Total Commander (free from Google Play) and granted the app with root permission. Edited the mentioned file and and also added  <group gid=”media_rw” /> in "READ_EXTERNAL_STORAGE"

p/s 2: Should be valid for all type of android phones.

Tuesday, May 27, 2014

Gunakan internet di Android dari PC (Reverse tethering) & remote telefon

Hanya untuk phone android yang sudah ROOTED dan PC Windows!


Sumber2:
http://forum.xda-developers.com/showthread.php?t=1371345
http://www.mobizen.com/

Apa benda ni? Macam mana? Apa kelebihan? Ni la soalan aku masa mula2 dapat tau boleh reverse tethering... meh aku cuba terangkan :-)

Apa benda ni?
Android tethering - kongsi internet dari telefon kepada peranti lain (cth: PC)
Reverse tethering - sebaliknya, kongsi internet PC kepada telefon

Macam mana?
Gunakan tool Android Reverse Tethering 3.19 dari link di bawah:
http://forum.xda-developers.com/showthread.php?t=1371345

Di dalam forum tu ada bagitau bagaimana untuk install dan cara2 untuk menggunakan tool tersebut. Senang je :-)

Apa kelebihan?
Sebelum jawab, aku akan bagitau situasi aku sebelum menggunakan tool ni. Aku berkerja di pejabat dan kebanyakan waktu dihabiskan depan PC. Dalam masa sama aku nak surf internet, tengok2 telefon, chatting guna Whatsapp dan charging.
Sebenarnya aku boleh buat semua tu dengan menggunakan WiFi atau 3G, tapi masalahnya bateri yang tengah charging memang lambat nak penuh sebab guna USB. Lagipon, kalau aku guna charger biasa, phone akan cepat panas dan akan merugikan penggunaan data 3G.

So, dengan adanya reverse tethering ni aku boleh jimat data 3G + charging laju + telefon tidak panas + boleh sambil buat kerja guna PC takyah nak angkat letak telefon selalu.

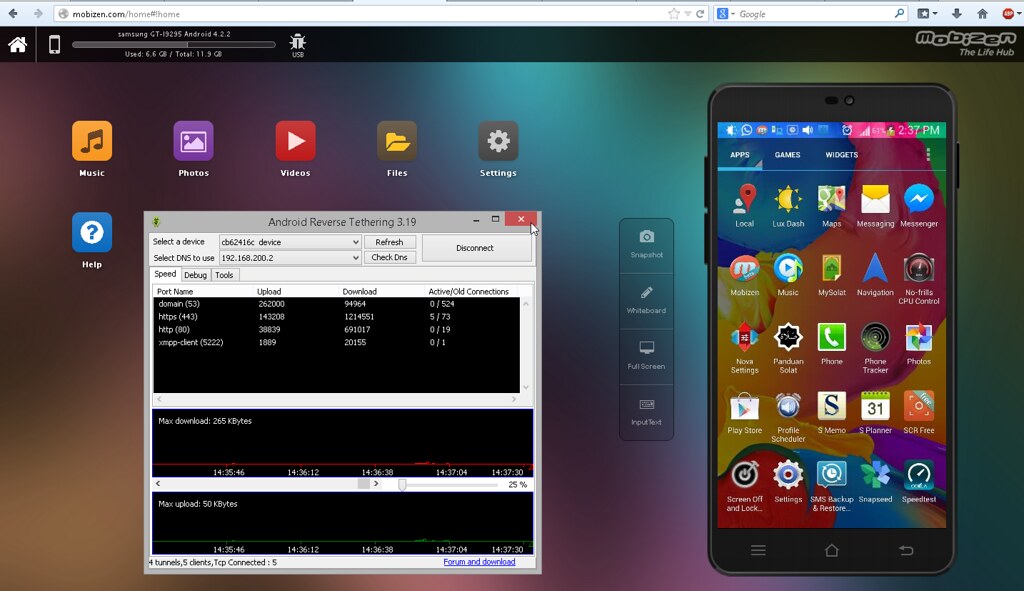
Eh, tapi macam mana pulak tu? Tak payah angkat letak telefon? Aaaaa sebab tu aku guna Mobizen hehe... ianya satu website (juga apps) yang boleh remote telefon android. Pergi ke http://www.mobizen.com/ dan daftar secara percuma... lepas tu install apps yang dia sediakan ke android.

Penggunaan Mobizen memang mudah, ikut saje cara2 install dan cara2 menggunakan. Lepas dah install semua di atas tu, boleh la focus kat PC je tak payah nak angkat letak telefon hehehe...

Selamat mencuba :-)

Thursday, May 1, 2014

[GUIDE] USB Reverse Tethering - New method - All PC operating systems

HUGE THANKS TO: phamthanhnam
http://forum.xda-developers.com/showthread.php?t=2287494

Introduction
This guide is intended to help you share Internet connection from your PC to your Android smartphone/tablet via USB cable. This technique is called USB reverse tethering. It is different from USB tethering in which you share Internet from your Android to your PC. There are many reasons why you need this technique working:
- You don't have mobile/wifi network and your PC doesn't have any wifi adapter
- You can't do tethering over wifi, for example, your company doesn't let you make any hotspot at work
- You don't want to spend money for a mobile plan, and you want a more stable and faster Internet connection than wifi
- You don't want your PC and your Android to become too hot because of wifi
- You want your Android charged while in use
...

You have searched and found some applications/tools/solutions, you followed exactly their instructions but finally you were frustrated because they didn't work, here I come for a new method. 
This method works following Internet connection sharing basics. If your Android device is able to do USB tethering, you will be able to do USB reserve tethering with this method!
Advantages:
- No additional software on your PC. Leave no trace on your PC. Imagine when you are at work and you have to install some crappy "toy" application on your PC to estiblish a tunnel connection for this task.
- Works with Windows, Linux and Mac OS X
- You know what you do. Who knows what the "easy-to-use" tools do when they fail to help you?
Disadvantages:
- You have to type some commands on your Android.
If you are ready, let's start!

Requirements:
- Rooted Android device with "USB tethering" capability. Check in Android Settings - Wireless & networks - Tethering & portable hotspot. Many stock ROMs disable this capability. You must enable it somehow (root your Android and use an application to enable or replace the stock ROM). CyanogenMod ROMs always have this capability. The important thing to remember is when you connect your Android and enable "USB tethering", it appears as a USB network adapter, not a mass storage or media device.
- PC with a working Internet connection.
- USB cable to connect your Android to your PC.
- Terminal Emulator on your Android. If you don't want to type commands on your touchscreen with Terminal Emulator, you can use your PC keyboard to enter commands with "adb shell". adb is a part of Android SDK which is available for download from Google. To use adb, you need to enable "USB debugging" on your Android.
- Optional, BusyBox on your Android.

Step 1: Connect your Android to PC by USB cable and enable "USB tethering". You are still allowed to enable this option even when your 3g/wifi on your Android is off.
- If you are using Linux (Ubuntu), you don't need to install anything. NetworkManager applet will try to establish a connection on the new detected wired network device.
- If you are using Windows, Windows will automatically search Windows Update and install driver for you. You can skip Windows Update search and install manually an already included driver from Microsoft. In Install Driver window, click Browse My Computer, then Let me pick..., select Network Adapters, uncheck Show Compatible Hardware, look at "Microsoft Corporation" at the left column, and choose Remote NDIS Compatible Device from the right column. You can install or update a driver from Device Manager in Windows.
- If you are using Mac, install driver HoRNDIS. You will be notified about a new network interface. Click "Network Preferences" in the dialog to add it to known interfaces list. Then "Apply".
- If you are using Linux without GUI or NetworkManager, run these commands as root (or use sudo):

Code:

ifconfig usb0 10.42.0.1 netmask 255.255.255.0


(suppose that you don't have any other USB network adapter, otherwise, your Android may be usb1, usb2...)

Code:

echo 1 > /proc/sys/net/ipv4/ip_forward


Command for sudo will be:

Code:

sudo 'echo 1 > /proc/sys/net/ipv4/ip_forward'


Code:

iptables -t nat -F
iptables -t nat -A POSTROUTING -j MASQUERADE


Step 2:
- If you are using Linux, click on NetworkManager applet at the top right of your screen, select "Edit Connections...". In tab "Wired", choose the new established connection (be careful, not Ethernet LAN connection) and click "Edit..." In tab "IPv4 Settings", choose "Shared to other computers" as Method. Click "Save". NetworkManager will reestablish the connection and assign to your PC an IP address on this USB network connection, default: 10.42.0.1. Leave Internet connections (wired or wireless) untouched.
- If you are using Windows, open "Network Connections" in Control Panel. It is somewhat different from setup in Linux. Right click on an Internet connection that you have. I assume that you are using a desktop which doesn't have any wifi adapter, so right click on LAN Ethernet connection with Internet, and select "Properties". In tab "Sharing" (or "Advanced" for Windows XP), click "Allow other network users to connect through...", then select the USB connection in dropdown list below. Click OK. Windows will automatically setup your USB network connection and assign to it an IP address, default for Windows 7: 192.168.137.1, default for Windows XP: 192.168.0.1. You can see your Internet connection is now "Shared" and your USB connection is now "Unidentified network".
- If you are using Mac, open System Preferences - Network. If you installed HoRNDIS, you will see a new network interface corresponding to your USB connection. With "Using DHCP" as Configure Ipv4, it may be already connected. Go back to System Preferences, click "Sharing". Select "Internet Sharing". Choose the Internet connection (Ethernet or Airport...) in "Share your connection from", and choose USB connection interface in "To computers using". Mac will assign to your USB connection interface an IP address, default: 192.168.2.1.
- If you are using Linux without GUI or NetworkManager, you have done all PC setup in step 1.

Your PC setup is now done!

Step 3:
Open Terminal Emulator on your Android. Type:

Code:

su


The command prompt must change from $ to #. If it does not, check to ensure that your device is rooted properly.
[UPDATED]Type the following command in Terminal Emulator, the same for all PC operating systems:

Code:

netcfg rndis0 dhcp


The name for usb interface inside Android may vary. It is usually rndis0 or usb0. Type

Code:

busybox ifconfig


to identify the name.
Use OLD instructions below when automatical dhcp method does not work.
[OLD]Type these following commands in Terminal Emulator:
For Linux PC:

Code:

ifconfig rndis0 10.42.0.2 netmask 255.255.255.0
route add default gw 10.42.0.1 dev rndis0


If route fails, try:

Code:

busybox route add default gw 10.42.0.1 dev rndis0


For Windows PC, use the same above commands, replace 10.42.0.2 by 192.168.137.2 (192.168.0.2 for Windows XP), replace 10.42.0.1 by 192.168.137.1 (192.168.0.1 for Windows XP)
For Mac PC, replace 10.42.0.2 by 192.168.2.2, replace 10.42.0.1 by 192.168.2.1
Now you can close Terminal Emulator and start the browser for Internet.

Some applications (download in Google Play, GMail, Facebook...) don't recognize Internet connection. You can try this way (WARNING: NOT TESTED):
- Enable temporarily 3G connection on your Android
- Type:

Code:

ifconfig rmnet0 0.0.0.0


The name for 3G interface inside Android may vary: ppp0, rmnet0... Type

Code:

busybox ifconfig


to identify the name.
before ifconfig rmnet0 ... above.
This will make applications see your Internet connection via USB as 3G!

USB tethering settings on Android will be reverted automatically when you unplug USB cable. To revert back settings on PC, uncheck "Allow other network users to connect through..." on Windows, "Internet sharing" on Mac, change from "Shared to other computers" back to "Automatically (DHCP)", or simply delete USB connection from NetworkManager on Linux.

Saturday, April 5, 2014

Android GPS-based apps, what suits me? Or yours?

Memandangkan tak berapa sibuk hari ni, aku cuba buat review beberapa apps android yang aku rasakan amat berguna untuk tracking lost phone (even family) dan juga navigasi sekali gus untuk melindungi data peribadi... in fact, ini first entry yang aku buat untuk apps review... Insya Allah aku cuba senaraikan kelebihan, kekurangan dan keperluan apps mengikut keperluan aku, atau mungkin jugak berguna kepada pembaca2 entry ni...

Ok, apa keperluan aku tu?
- untuk jejak pergerakan pemilik phone dan sekali gus menjejak phone itu sendiri (kalau hilang)
- untuk report lokasi kepada puan besar dan sekali gus untuk puan besar report lokasi kepada aku, atau aku boleh tahu di mana dia berada
- untuk semak perjalanan (history), aku rasa amat berguna kalau ada kes kecurian... so boleh tengok pergerakan pencuri tersebut (kalau dia bodoh tak OFF phone lah)
- untuk mendapatkan navigasi ke satu2 lokasi
- untuk melindung data2 peribadi dan penting dari dicuri sang pencuri

perlu ke semua tu? perlu!
- lebih2 lagi ketika negara kita dan dunia semakin diancam kegiatan jenayah berleluasa seperti penculikan, pencurian kenderaan, ragut dan macam2 lagi
- untuk menjimatkan masa untuk sampai ke satu2 lokasi
- untuk berkongsi dan mendapatkan maklumat
- untuk bersosial

Apps apa yang boleh memenuhi keperluan aku? aku cuba senaraikan apps yang pernah aku cuba...

Find My Phone

Kelebihan:
- boleh update lokasi (check in)
- boleh lihat lokasi friend / family tanpa disuruh update (jika kita admin, boleh update sendiri)
- boleh sembang
- boleh semak history

Kekurangan:
- tidak melindungi data peribadi atau tiada kawalan ke atas phone
- tidak boleh mendapatkan navigasi ke lokasi dikehendaki

Waze
Kelebihan:
- maklumat trafik secara real-time
- ramai kawan2 guna sebab boleh link account facebook / twitter
- boleh mendapatkan navigasi ke lokasi dikehendaki
- boleh check in dan boleh intergrate dengan apps Foursquare

Kekurangan:
- lokasi kawan atau family hanya boleh dilihat jika mereka update
- tidak melindungi data peribadi atau tiada kawalan ke atas phone

Foursquare
Kelebihan:
- boleh rekod dan check in sambil berkongsi maklumat lokasi (gambar, komen, dsb)
- boleh mendapatkan navigasi
- tempat menarik berhampiran lokasi

Kekurangan:
- lokasi kawan atau family hanya boleh dilihat jika mereka update
- tidak melindungi data peribadi atau tiada kawalan ke atas phone

Google Device Manager
Kelebihan:
- melindungi data peribadi (wipe data secara remote atau web base)
- boleh mengetahui lokasi phone sendiri dan family (jika kita tahu password mereka)
- boleh ring phone in case hilang dalam rumah atau berdekatan

Kekurangan:
- tidak boleh mendapatkan navigasi
- tiada fungsi sosial
- tiada history

Kesimpulan, memang setakat ni aku tak jumpa kesemua feature yang aku perlu di dalam satu apps... bermakna aku kena install semua apps di atas untuk memenuhi kehendak aku huhuhu... apa2 pon, ini cuma pendapat aku dan mungkin ada banyak fungsi2 lain yang aku terlepas pandang... sebenarnya ada banyak lagi GPS-based apps yang berguna... usually aku akan install jika satu2 apps tu mendapat rating yang tinggi dari user, juga PERCUMA :-P

Komen? silakan :-)