HUGE THANKS TO: phamthanhnam
http://forum.xda-developers.com/showthread.php?t=2287494Introduction
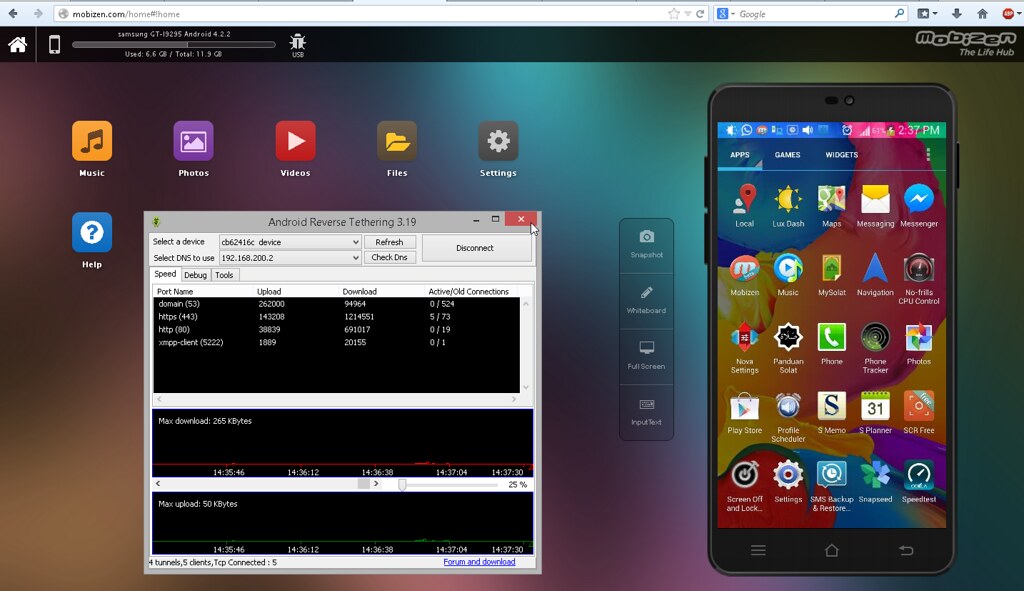
This guide is intended to help you share Internet connection from your PC to your Android smartphone/tablet via
USB cable. This technique is called USB reverse tethering. It is different from
USB tethering in which you share Internet from your Android to your PC. There are many reasons why you need this technique working:
- You don't have mobile/wifi network and your PC doesn't have any wifi adapter
- You can't do tethering over wifi, for example, your company doesn't let you make any hotspot at work
- You don't want to spend money for a mobile plan, and you want a more stable and faster Internet connection than wifi
- You don't want your PC and your Android to become too hot because of wifi
- You want your Android charged while in use
...
You have searched and found some applications/tools/solutions, you followed exactly their instructions but finally you were frustrated because they didn't work, here I come for a new method.

This method works following
Internet connection sharing basics. If your
Android device is able to do USB tethering, you will be able to do USB reserve tethering with this method!
Advantages:
- No additional software on your PC. Leave no trace on your PC. Imagine when you are at work and you have to install some crappy "toy" application on your PC to estiblish a tunnel connection for this task.
- Works with Windows, Linux and Mac OS X
- You know what you do. Who knows what the "easy-to-use" tools do when they fail to help you?
Disadvantages:
- You have to type some commands on your Android.
If you are ready, let's start!
Requirements:
- Rooted Android device with "USB tethering" capability. Check in Android Settings - Wireless & networks - Tethering & portable hotspot. Many stock ROMs disable this capability. You must enable it somehow (root your Android and use an application to enable or replace the stock ROM).
CyanogenMod ROMs always have this capability. The important thing to remember is when you connect your Android and enable "USB tethering", it appears as a USB network adapter, not a mass storage or media device.
- PC with a working Internet connection.
- USB cable to connect your Android to your PC.
- Terminal Emulator on your Android. If you don't want to type commands on your touchscreen with Terminal Emulator, you can use your PC keyboard to enter commands with "adb shell". adb is a part of Android SDK which is available for download from Google. To use adb, you need to enable "USB debugging" on your Android.
- Optional,
BusyBox on your Android.
Step 1: Connect your Android to PC by USB cable and enable "USB tethering". You are still allowed to enable this option even when your 3g/wifi on your Android is off.
- If you are using Linux (Ubuntu), you don't need to install anything.
NetworkManager applet will try to establish a connection on the new detected wired network device.
- If you are using Windows, Windows will automatically search Windows Update and install driver for you. You can skip Windows Update search and install manually an already included driver from Microsoft. In Install Driver window, click Browse My Computer, then Let me pick..., select Network Adapters, uncheck Show Compatible Hardware, look at "Microsoft Corporation" at the left column, and choose Remote NDIS Compatible Device from the right column. You can install or update a driver from Device Manager in Windows.
- If you are using Mac, install driver HoRNDIS. You will be notified about a new network interface. Click "Network Preferences" in the dialog to add it to known interfaces list. Then "Apply".
- If you are using Linux without GUI or NetworkManager, run these commands as root (or use sudo):
Code:
ifconfig usb0 10.42.0.1 netmask 255.255.255.0
(suppose that you don't have any other USB network adapter, otherwise, your Android may be usb1, usb2...)
Code:
echo 1 > /proc/sys/net/ipv4/ip_forward
Command for sudo will be:
Code:
sudo 'echo 1 > /proc/sys/net/ipv4/ip_forward'
Code:
iptables -t nat -F
iptables -t nat -A POSTROUTING -j MASQUERADE
Step 2:
- If you are using Linux, click on NetworkManager applet at the top right of your screen, select "Edit Connections...". In tab "Wired", choose the new established connection (be careful, not Ethernet LAN connection) and click "Edit..." In tab "IPv4 Settings", choose "Shared to other computers" as Method. Click "Save". NetworkManager will reestablish the connection and assign to your PC an
IP address on this USB network connection, default: 10.42.0.1. Leave Internet connections (wired or wireless) untouched.
- If you are using Windows, open "Network Connections" in Control Panel. It is somewhat different from setup in Linux. Right click on an Internet connection that you have. I assume that you are using a desktop which doesn't have any wifi adapter, so right click on LAN Ethernet connection with Internet, and select "Properties". In tab "Sharing" (or "Advanced" for
Windows XP), click "Allow other network users to connect through...", then select the USB connection in dropdown list below. Click OK. Windows will automatically setup your USB network connection and assign to it an IP address, default for Windows 7: 192.168.137.1, default for Windows XP: 192.168.0.1. You can see your Internet connection is now "Shared" and your USB connection is now "Unidentified network".
- If you are using Mac, open System Preferences - Network. If you installed HoRNDIS, you will see a new network interface corresponding to your USB connection. With "Using DHCP" as Configure Ipv4, it may be already connected. Go back to System Preferences, click "Sharing". Select "Internet Sharing". Choose the Internet connection (Ethernet or Airport...) in "Share your connection from", and choose USB connection interface in "To computers using". Mac will assign to your USB connection interface an IP address, default: 192.168.2.1.
- If you are using Linux without GUI or NetworkManager, you have done all PC setup in step 1.
Your PC setup is now done!
Step 3:
Open Terminal Emulator on your Android. Type:
The command prompt must change from $ to #. If it does not, check to ensure that your device is rooted properly.
[UPDATED]Type the following command in Terminal Emulator, the same for all PC operating systems:
The name for usb interface inside Android may vary. It is usually rndis0 or usb0. Type
to identify the name.
Use OLD instructions below when automatical dhcp method does not work.
[OLD]Type these following commands in Terminal Emulator:
For Linux PC:
Code:
ifconfig rndis0 10.42.0.2 netmask 255.255.255.0
route add default gw 10.42.0.1 dev rndis0
If route fails, try:
Code:
busybox route add default gw 10.42.0.1 dev rndis0
For
Windows PC, use the same above commands, replace 10.42.0.2 by 192.168.137.2 (192.168.0.2 for Windows XP), replace 10.42.0.1 by 192.168.137.1 (192.168.0.1 for Windows XP)
For Mac PC, replace 10.42.0.2 by 192.168.2.2, replace 10.42.0.1 by 192.168.2.1
Now you can close Terminal Emulator and start the browser for Internet.
Some applications (download in Google Play, GMail, Facebook...) don't recognize Internet connection. You can try this way (WARNING: NOT TESTED):
- Enable temporarily 3G connection on your Android
- Type:
Code:
ifconfig rmnet0 0.0.0.0
The name for 3G interface inside Android may vary: ppp0, rmnet0... Type
to identify the name.
before ifconfig rmnet0 ... above.
This will make applications see your Internet connection via USB as 3G!
USB tethering settings on Android will be reverted automatically when you unplug USB cable. To revert back settings on PC, uncheck "Allow other network users to connect through..." on Windows, "Internet sharing" on Mac, change from "Shared to other computers" back to "Automatically (DHCP)", or simply delete USB connection from NetworkManager on Linux.